How to Upload a Model
Uploading your Model to the DAFNI platform is the mechanism through which you make your Model accessible to be used on the platform. This guide will take you through the necessary steps to upload your DAFNI ready Model.
If you would like to learn more about creating a DAFNI ready Model, please see How to Create a DAFNI Ready Model.
To be able to complete the steps laid out in this guide, you will need to have access to Docker from the machine you are working on.
There are three major steps to uploading your Model to the DAFNI platform that this guide will take you through. They are:
Saving Your Model to a tar Archive
The first step to uploading your Model is to save the Docker Image that
contains your Model to a tar archive. For the purpose of this guide, I will
be working with an example Model that I have already built into a Docker
Image and tagged example-model:to-upload with the command:
docker build -t example-model:to-upload .
Remember to replace this tag with the tag you used when you built your Model in all of the following examples. (If you did not provide a tag then docker will use the default one titled "latest")
To create this tar archive containing your Model, we are going to use the
docker save command
(Docker documentation). To
save the example Model to a tar archive called example-model.tar, the
following command can be used.
docker save -o example-model.tar example-model:to-upload
This can be represented more generally as the following, where the parts in [ ] should
be replaced with the appropriate values.
docker save -o [name of file to save Model to].tar [tag of the Model to save to file]
Note: It is possible to save more than one Docker Image to the archive using this command. However, DAFNI does not accept tar archives that contain more than one image and all uploads containing more than one image will be rejected.
To avoid this, make sure you use a complete image tag when using the
docker savecommand e.g.example-model:to-uploadrather than justexample-model(which would archive all images containingexample-modelin the tag.)
Compressing your tar archive
DAFNI supports image archives that have been compressed with gzip compression. This
reduces the size of the archive and speeds up the Model upload process. The
example Model we have been considering in this guide can be saved to a
gzip compressed archive suitable for uploading to DAFNI with the following command (when
working on a Mac or Linux machine):
gzip example-model.tar
or more generally:
gzip [name of file you have saved]
Note: You can combine both the save and compression commands into a single command (on Mac or Linux machines) with:
docker save example-model:to-upload | gzip > example-model.tar.gzor more generally:
docker save [tag of the Model to save to file] | gzip > [name of file to save Model to].tar.gz
In windows you can also, easily compress the tar file, but you need to be careful that it's in the correct format (gzip). The default Windows zip is not in this format, so you will need to use a different tool to do this. 7-zip is a good example of a program that can handle this format. If 7-zip is installed you can right click on the file and select 7-Zip > Add to archive , and then in the dialog box make sure the file format selected is gzip.
Creating a Model Definition File
The other item required to upload a Model is a Model Definition file. Please see How to Write a Model Definition File for information about creating a definition file and then return here once you have one.
Uploading to the Platform
Now you have both your Model written to a tar archive and a Model Definition providing the necessary information about your Model, you are ready to upload it to DAFNI. To do this, you will first need to head over to the Model Catalogue page in the DAFNI web app as show here:

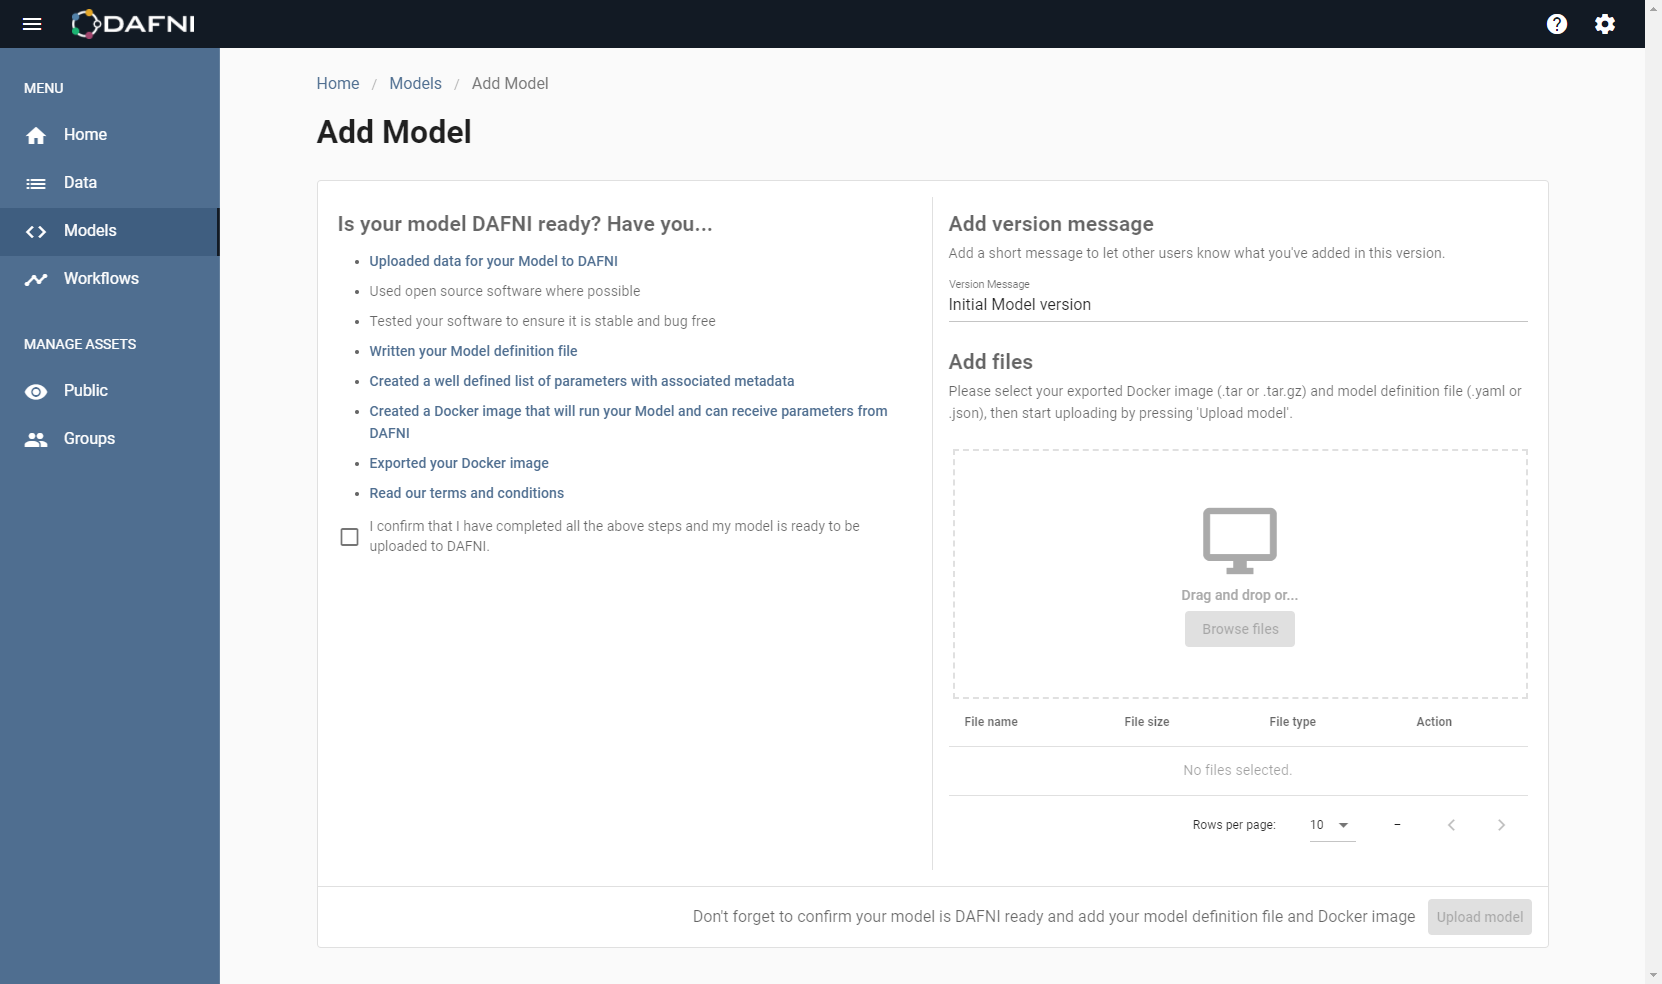
press the "Add model" button (outlined in orange in the previous image) to start adding your new on the "Add " page, shown here:

The list of items under "Is your model DAFNI ready?" is a list of steps you should undertake before you are ready to upload your model. Once you have read through the necessary steps you can tick the confirm button at the bottom of the list.
Once confirmed, the Add files panel is available. Now you can either drag and drop your Model and definition file directly on to this page, or click "Browse files" and locate them in your computer. Once selected, they should appear under the upload box. Before you can upload your Model to DAFNI, you need to add a version message in the text box above the Add files section. What you write in this field is up to you, some users use this field as a "git commit" style message describing any updates made whereas others use it as a way of inputting a model version number. Once you have filled in this field, you can now click the "Add model" button to upload your files.
The upload may take some time, so please be patient and do not navigate away from the page until it is complete. Once your model has finished uploading, you will be automatically redirected to the Models page where your model should appear. If you see a "Model waiting to ingest" marker next to your Model then it is currently being run through a variety of checks. You may need to refresh the page to see any updates. These checks should finish shortly and then you can continue to the next step, that is creating a workflow on the "Workflows" page incorporating your Model and allowing it to be run.
