How to Create a Parameter Set
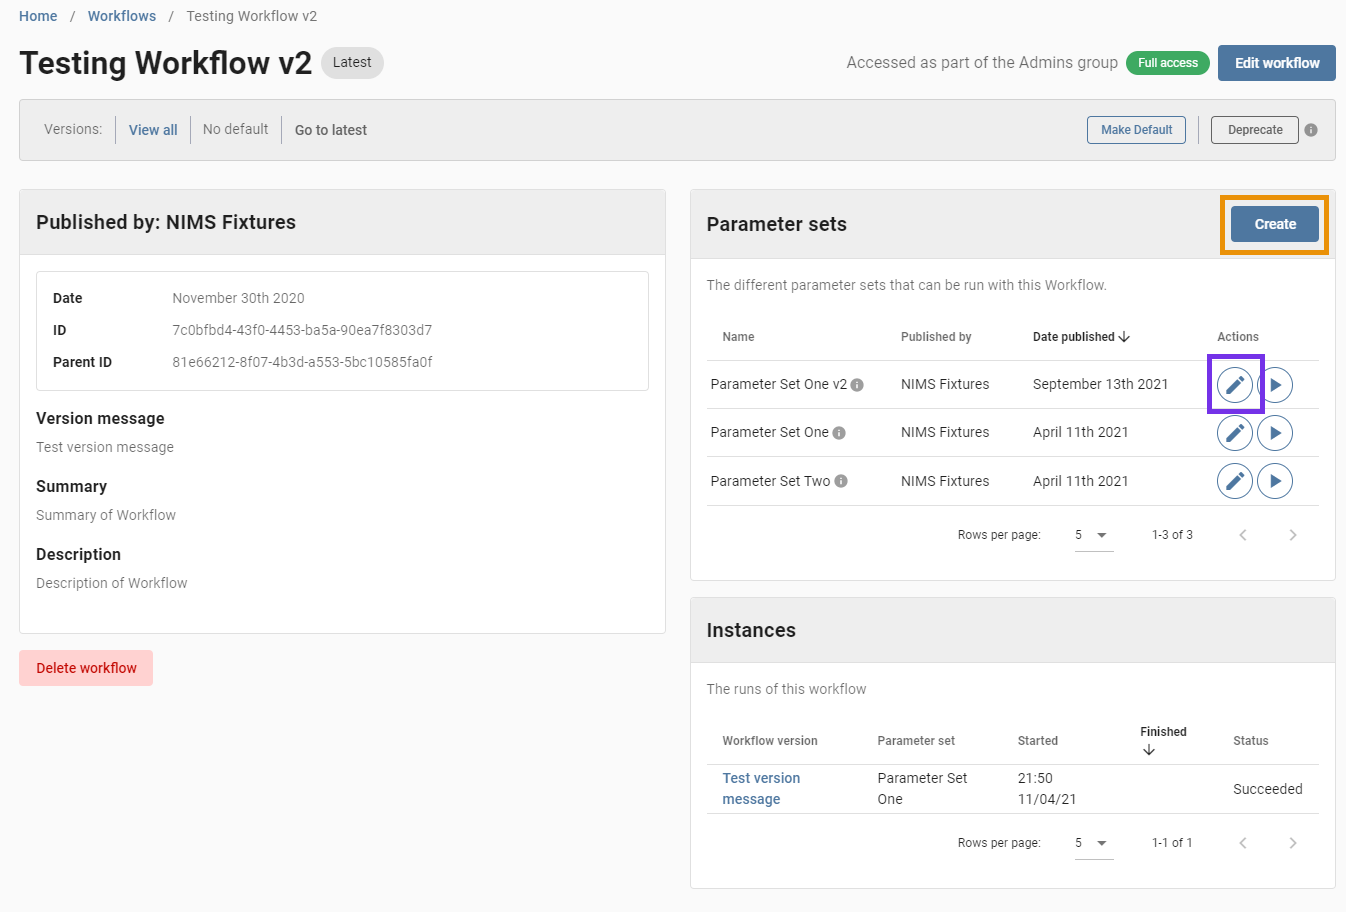
Creating a Parameter Set is done in two places in DAFNI, one is when you are creating a brand new Workflow where, after defining the steps in the Workflow, you will need to create the first Parameter Set for that Workflow. The second is after creating a Workflow, if you navigate to the Details page for the Workflow (by clicking its name in the Workflow catalogue) which is seen below.

As you can see there is a list of Parameter Sets that have been created for this Workflow and highlighted in orange there is a "Create" button that allows you to create a new Parameter Set for this Workflow. Also highlighted in purple is the edit button which allows you to edit an existing Parameter Set.
Note: Editing a Parameter Set will overwrite it.
For the purpose of this documentation, we will be assuming you have gone through the documentation in How to Create a Workflow but the information provided here will still be useful if you are creating a Parameter Set for a Workflow that already existed.
Parameter Set Metadata
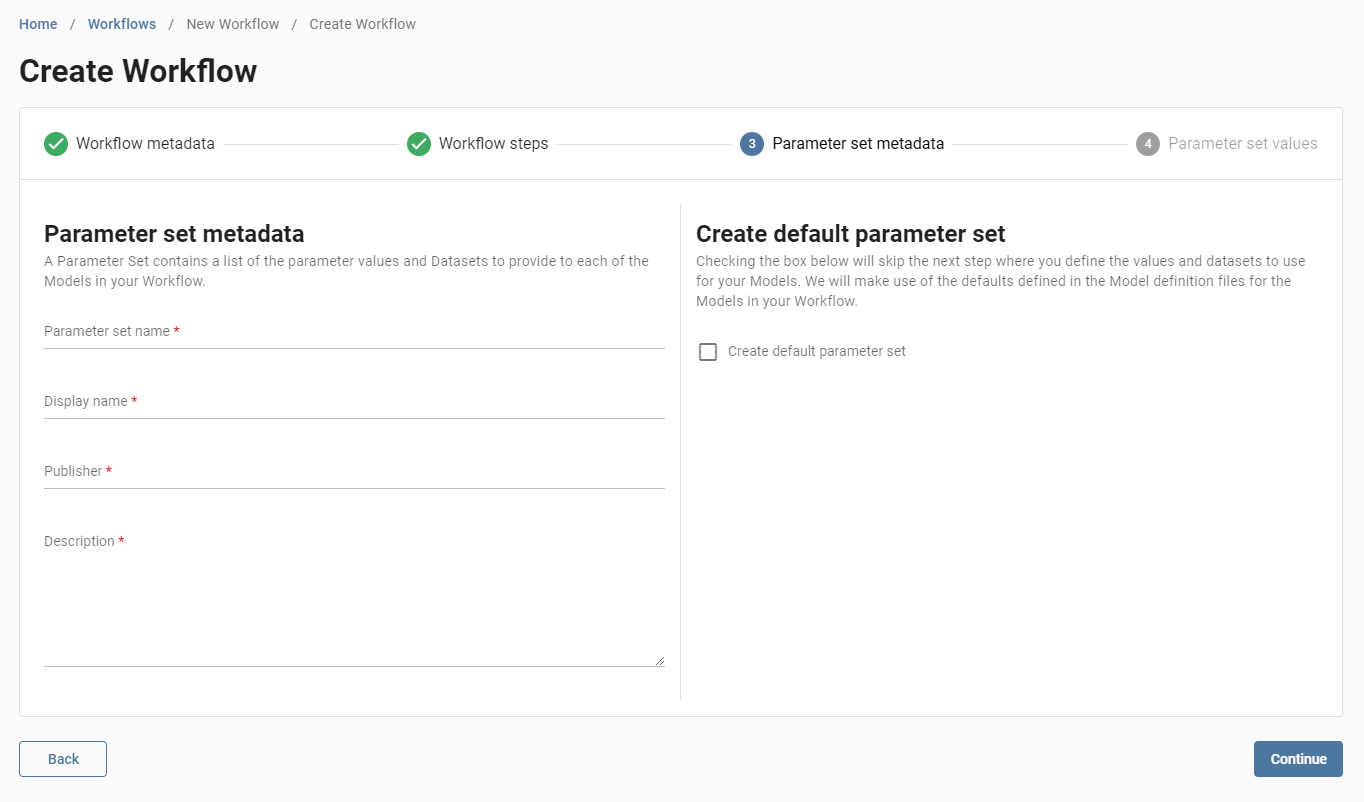
After you have created the steps for your Workflow and have pressed the "Continue" button you will be shown the form for Parameter Set metadata as shown below.

Similar to the Workflow name field, the Parameter set name field must only contain lower case alphanumeric characters and dashes.
The Display name field is what you and others you have shared your Workflow with will see in the Parameter Set list on the Workflow details page. So give your Parameter Set a sensible name and we'll move on.
The Publisher field will again be visible in the Parameter Set list on the Workflow details page and is an opportunity for you to let other users know who made this Parameter Set. As with Workflows, you would usually enter your name into this field but you can also enter your Organisation, Company name, or a Project name if you would prefer.
The Description field will be shown in the tooltip when you hover over the Parameter Set name on the Workflow details page. While this is supposed to be a long-form description field, keep in mind that this will be displayed in a tooltip so a description longer than a few lines might not display very well.
Creating a Default Parameter Set
Thats all the metadata fields a Parameter Set requires but before we move on we'll quickly cover what the "Create default parameter set" checkbox is on the right-hand side of this page and how to use it, though for the sake of this documentation we will not be checking the box.
If you check the checkbox you will notice that the "Continue" in the bottom right becomes an "Upload workflow" button. This is because this is an optional checkbox that allows you to skip the final stage of the Workflow creation process if the Models you have chosen to use allow. If you were to check the box and press the "Upload workflow" button then DAFNI would collect the Models from the model steps you have created, look at the Model definitions and pull out the default values for the parameters and dataslots defined in those Models. We will then use these default values to construct a Parameter Set for you that contains all the default values.
As you might have guessed, this is a process that won't work for every Workflow.
Parameters and dataslots can be marked as required (by setting the "required" field to
true) but DAFNI does not enforce adding defaults for these required parameters /
dataslots. As a result, a Model can be uploaded that has a required parameter /
dataslot that does not have a default provided, if your Workflow makes use of
one of these Models then the default Parameter Set creation process will fail.
When you are creating a brand new Workflow we try to detect these
Models and disable the checkbox if the process will fail. But if you end up
trying to create a default Parameter Set anyway then an error message will be returned that
lists the fields that have been marked as required but haven't been provided a default value.
Parameter Set Values
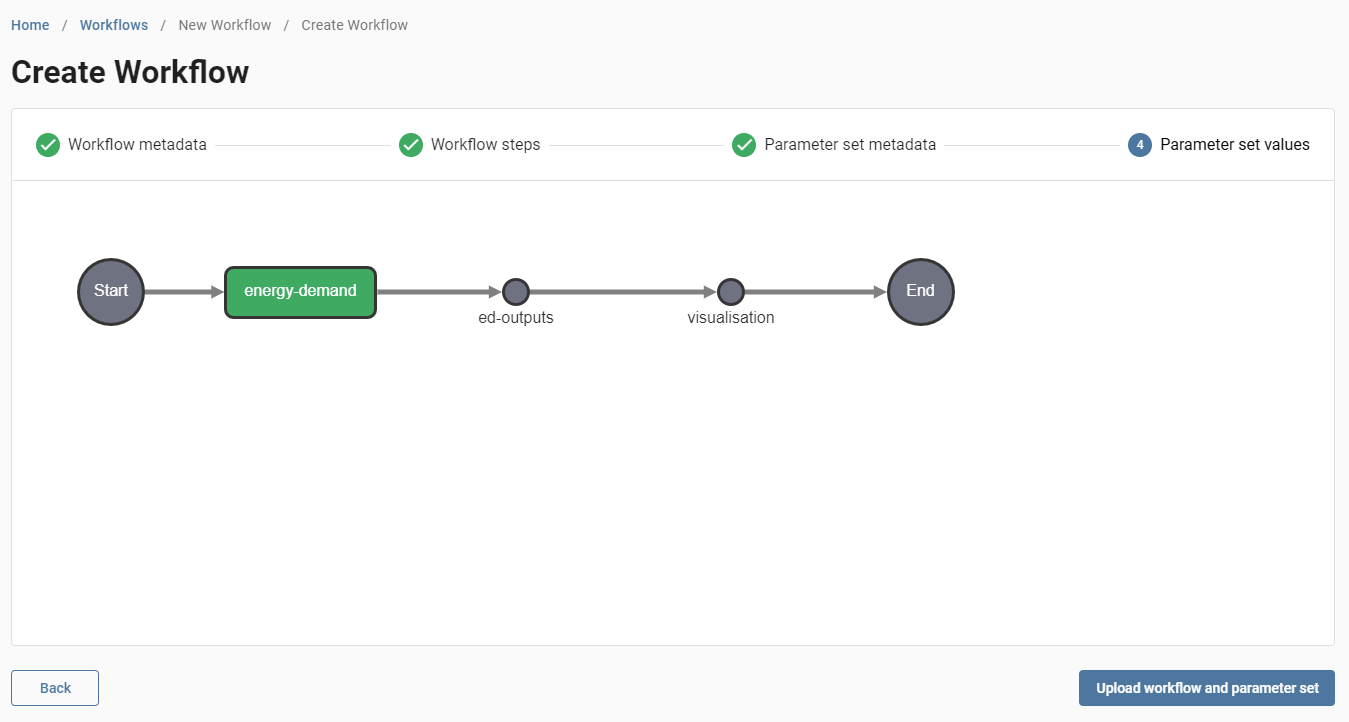
Once you have filled in the metadata make sure you do not have the "Create default parameter set" box checked and press the "Continue" button. The next and final stage of Workflow creation is entering values for the parameters and dataslots of the model steps that you have added to your Workflow, shown below.

As you might notice, this looks very similar to the stage where you add steps to your Workflow, there are a few key differences though. Publisher and visualisation steps appear as small grey circles and are not clickable, this is because the information for these steps has already been added and we don't need to add any more to the Parameter Set. The "+" step is no longer a part of your Workflow, this is because at this point you have added all the steps in your Workflow, if you would like to add more steps you need to go back to the "Workflow steps" stage.
To add values to the parameters and dataslots in your model steps, click on the model step in your Workflow. You will see something like the configuration form in the image below.

The default values for parameters and dataslots, as defined in the definition for the Model referenced in this step, will automatically have been filled in. The step name, Model name and version information for the Model is displayed for convenience.
Parameters
Let's start with the "Parameters" table. You should see a list of the parameters in the table that this Model has defined. Any required parameters are marked with a red "*" and hints have been provided for you if they have been added to the Model definition, e.g. min/max values for numeric parameters. There is not much we can really tell you about what to enter into this list of parameters as it is unique to the Model that you have selected. Do make sure that you fill in all the parameters, we only display the first ten parameters in the table by default, so if there are more parameters you will need to navigate to the next page of the table using the arrows in the bottom right-hand corner of the table.
Dataslots
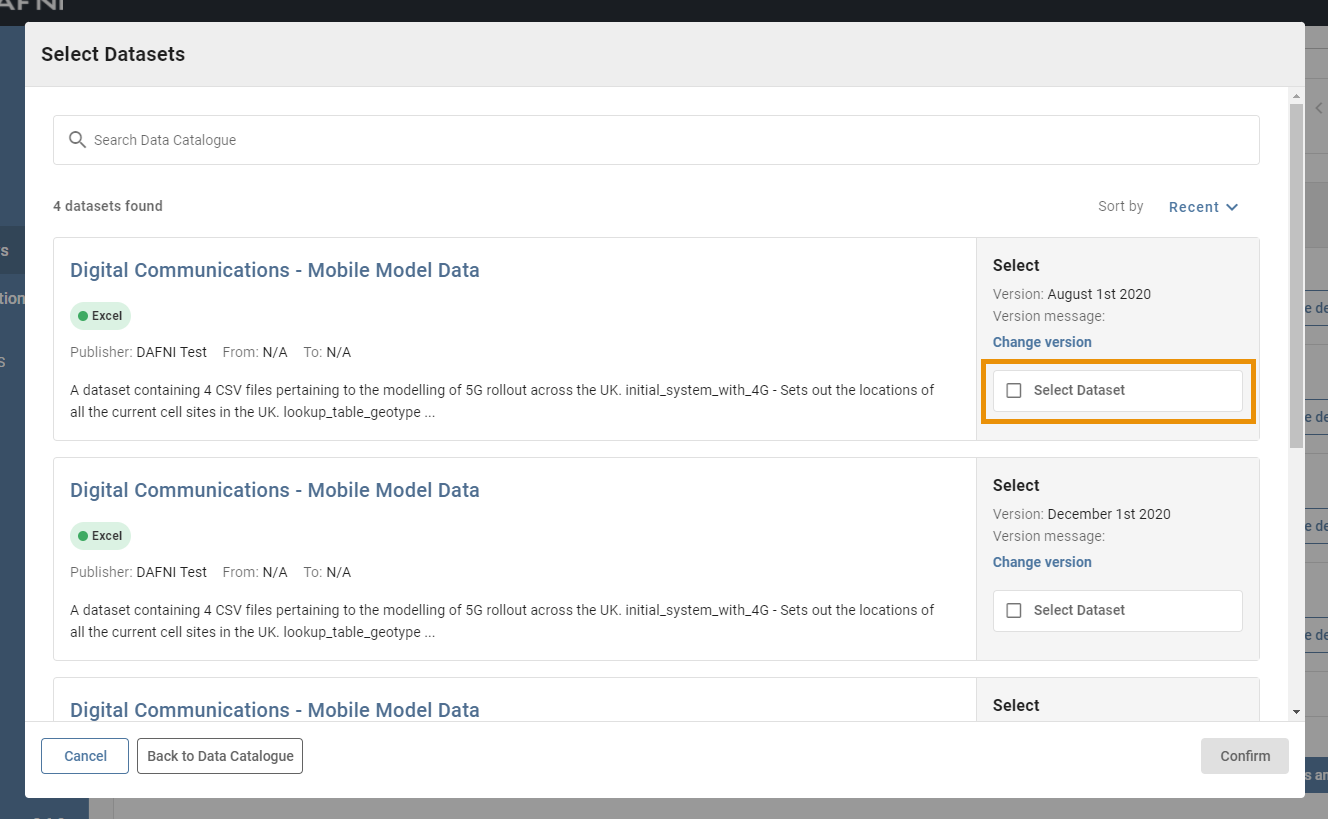
Next, we have the "Datasets to use in Model" table. You should see a list of tables that represent the dataslots that this Model requires. The name of the dataslot is on the left -hand side of the list and again, required dataslots are marked with a red "*". You can remove the default datasets that have been added to a dataslot by pressing the blue bin icon on the right-hand side of the dataset's row in the table. To add a new dataset to a dataslot, click the edit button, which has a pencil icon. This will open a dialog that shows a minimized version of the Data catalogue, shown below.

Highlighted in orange is the "Select dataset" checkbox which must be checked to select the dataset, you can change the version of the dataset you want to select by clicking on "change version" just above the checkbox. This will show a simple list of the versions the dataset has, clicking on the date of a version in the list will select that version for use. When you select a version you should notice the version date and message have been updated in the list. Check the box for all the datasets you want to add to this dataslot then click the "Confirm" button in the bottom right-hand corner of the dialog.
If you make a mistake at any point and want the default datasets back for a dataslot, you can click the "Use default" button next to the dataslot.
Once you have filled in all the parameter values and datasets you want, click the "Set parameters and datasets" button to save this to the parameter set.
Editing a Step
Similar to adding steps to Workflow, you can click back on a step in the Parameter Set view to edit the values and datasets you have provided previously.
Uploading Your Parameter Set
Once you have added values and datasets to all the parameters and dataslots for all the model steps in your Workflow you can click the "Upload workflow and parameter set" button to upload both your Workflow and Parameter Set to DAFNI. When you click this button, if the validation process passes, you will be redirected to the Workflow catalogue where you should see your Workflow in the list.
Tip: If you have a large number of model steps in your Workflow and only one of those has a required parameter/dataslot without a default value provided, you do not need to click on all the steps in the Workflow to add values. You can just click on the one model step that requires a value adding, add that value, save the step and upload the Parameter Set and DAFNI will fill in the defaults for the rest of the steps. The same principle applies if there is only one model step that you want to change the parameter values/datasets for.
Executing a Workflow
To execute a Workflow, we need a Parameter Set to execute with. You can click the "Execute" button next to a Workflow in the catalogue and a dialog will open that contains the list of Parameter Sets for that Workflow. Select a Parameter Set and click the "Execute workflow" button in the dialog to execute the Workflow.
You can also execute a Workflow by going to the details page for the Workflow and pressing the execute button (which looks like a play button) next to the Parameter Set in the Parameter Set list that you want to execute with.
Instances that have been created (by executing a Workflow) are shown in the Instances list on the Workflow details page, below the Parameter Sets list. You can see a detailed view of the status of the individual steps in the instance by clicking on its name in the list. This will show you your Workflow and each of the steps will have an icon on them representing their status. You can click on the steps to see the configuration that you provided to the step and also to see a text version of the step's status.
