How to Loop a Workflow
DAFNI has powerful looping functionality, which allows you to loop over a Workflow regardless of how many steps are involved in the Workflow, for most of the step types available in DAFNI.
Note: Currently, the only step types not permitted within a Workflow that is to be looped are the loop step type itself, and the parameter sweep step. In practice this means that loops of loops/or sweeps are not supported.
You can choose to loop over parameters or dataslots, providing either a list of values or datasets. If the parameter you want to loop over takes numeric values, you can also generate values using one of DAFNI's random number-sampling techniques.
The configuration to support looping is complex and can be a little intimidating at first glance so this page will guide you through how to configure a loop step and the differences between the options available.
Setup
In order to provide as much flexibility as possible, DAFNI loops over entire Workflows rather than individual Models or individual steps. This means that when it comes to creating a loop, the first thing you need to do is decide on what steps you would like to loop and then create a Workflow that contains only those steps.
This may be best understood with an example, so let's take the Covid 19 Model below.
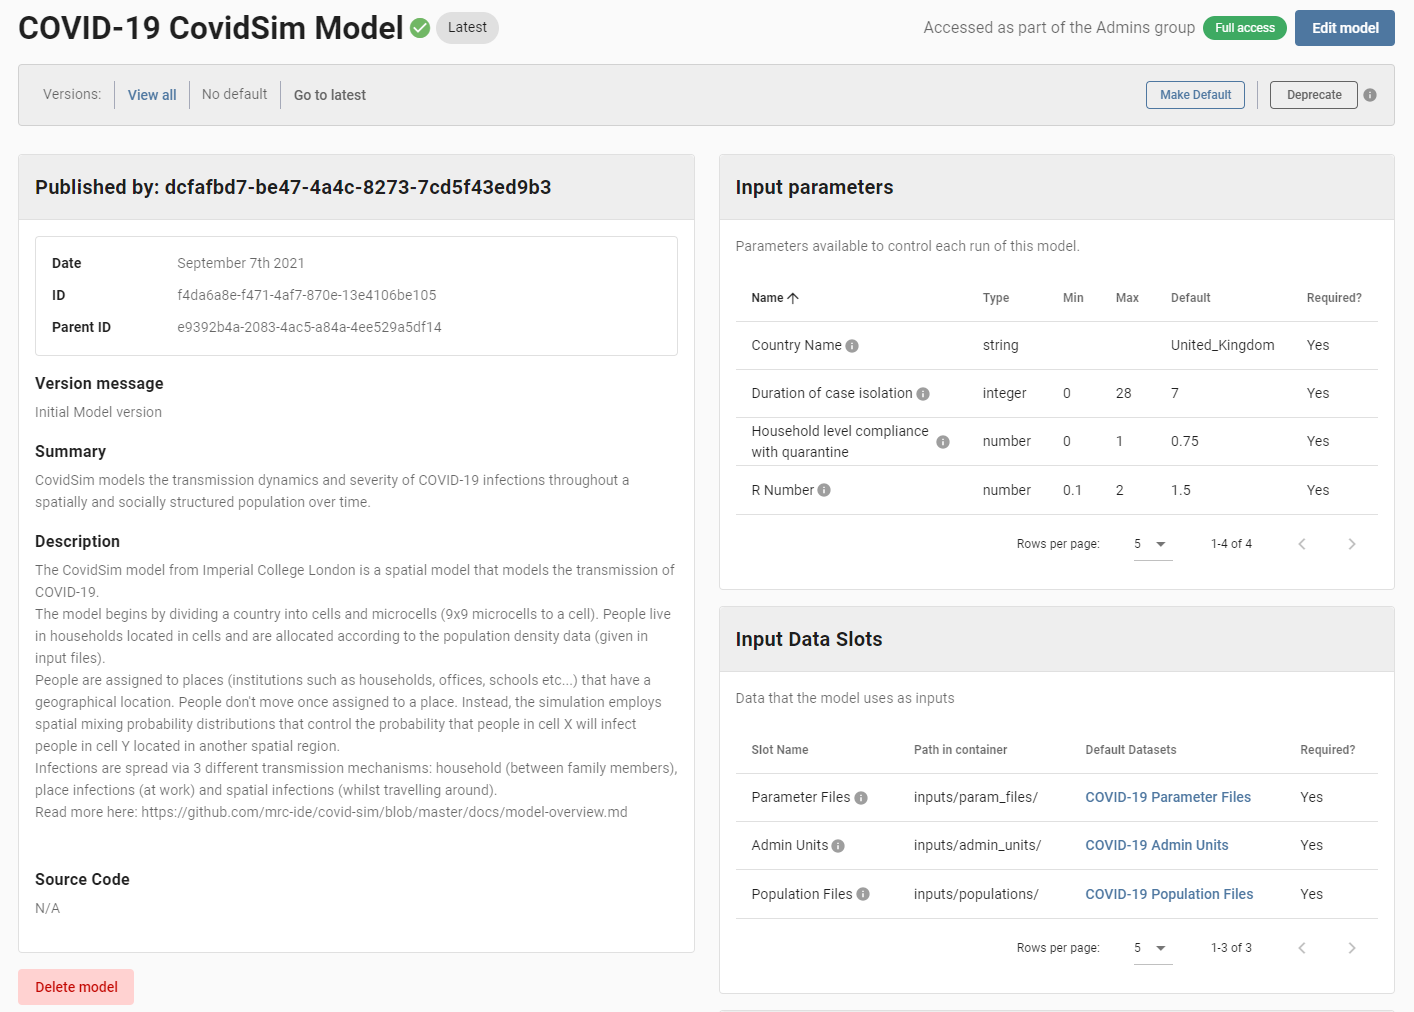
As you can see, this Model has a parameter called "R Number", let's say you were wanting to run the Model several times while varying the "R Number" each time it is run. For each time the Model is run you will want to upload its results, which will typically be done via a publish step in the looping workflow, into DAFNI's data catalogue.
To do this you would need to:
- create a Workflow with a Model step that runs the Covid 19 Model
- as this workflow will itself be run inside a looping workflow, we should ensure there are no "publish" or "publish and visualise" steps included (publishing is best done in the looping workflow itself & we want to avoid "double-publishing" the output).
Note: If you are working with a workflow that has already been created (with a "publish" step), it is recommended that you create a copy of the workflow, and then delete the "publish" step in the copy.
If you are not yet comfortable with creating a Workflow on DAFNI and would like more information then see How to Create a Workflow.
In order to loop over this Workflow, DAFNI needs a Parameter Set that contains the values to use for the parameters and dataslots that are not being varied by the loop.
For the Covid 19 Model, that would be the following parameters:
- "Country Name"
- "R Number"
- "Duration of case isolation"
- "Household level compliance with quarantine"
So the next thing to do would be to create a Parameter Set for the Workflow you are wanting to loop that contains the correct values for the other parameters. As DAFNI doesn't know you are creating a loop at this point, you will need to enter values for the parameter(s) you are going to vary into the Parameter Set. These values will be overwritten during the loop so don't worry too much about getting them right at this stage.
Given you will be asked to create a Parameter Set after creating your Workflow, this is a natural next step and there's nothing extra that you would have to do on top of the creation of a regular Workflow.
Creating a Loop
At this point, you should have a Workflow that contains the steps that you would like to loop over and a Parameter Set that contains the values for the parameters and datasets for the dataslots that you are not varying within the loop. In this section, we will go step by step through the process of creating a loop.
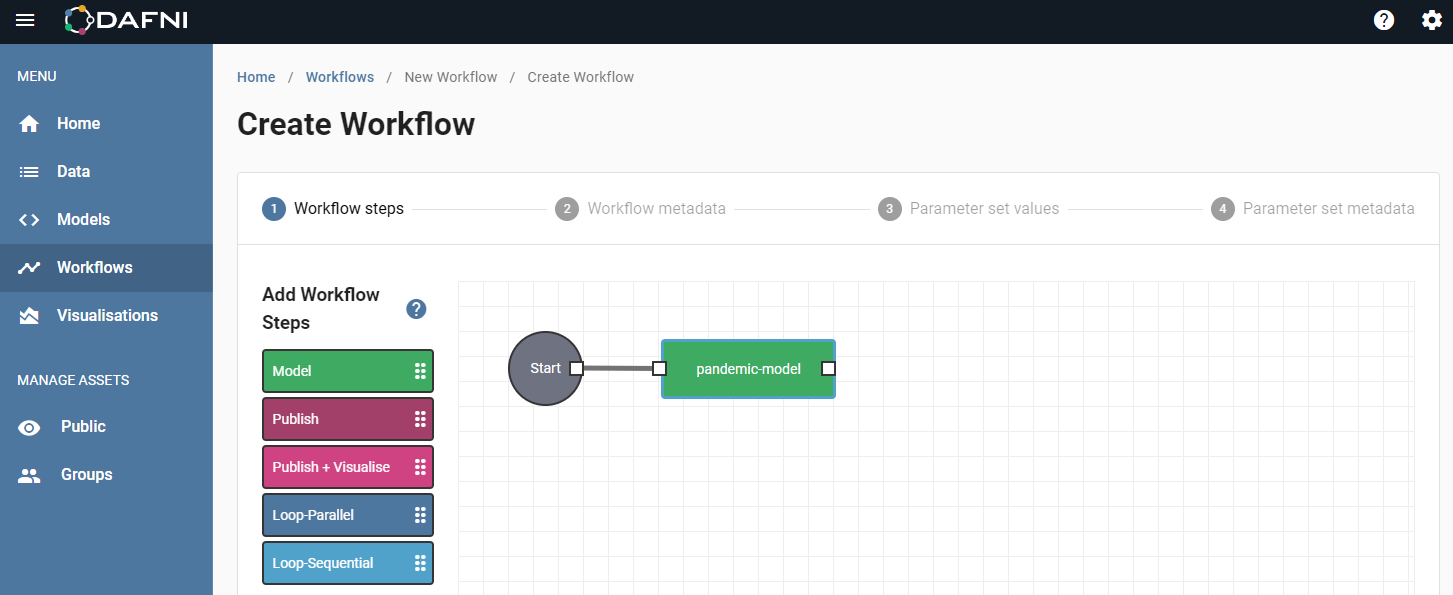
As with the previous section, the first step is to press the "Create workflow" button on the Workflow catalogue page.

At this point you will be taken to the Workflow creation canvas. You will notice that there are two kinds of loop steps available:
- Loop-Parallel
- Loop-Sequential
Parallel vs Sequential
DAFNI allows you to loop a Workflow using two different methods.
Parallel
A parallel loop will try to run all iterations of the loop simultaneously, with each loop in isolation. In practice, depending on the number of iterations you are trying to run and the hardware available at the time, the iterations may be scheduled so they are not simultaneous. Though they will all still be run in isolation and started as soon as is possible.
The number of iterations that are run in a parallel loop depends on the number of values/
datasets you provide to the parameters/dataslots you are varying. DAFNI will programmatically
generate all possible permutations of the parameters and dataslots you set on the loop step. As
an example, consider you are providing the following values for two parameters (first_name and
surname) as well as a single dataslot (family_tree):
first_name: ['Joe', 'Holly']
surname: ['King', 'Wood']
family_tree: [['family-tree-one-dataset-id'], ['family-tree-two-dataset-id']]
DAFNI would then generate all possible permutations of these values which would result in 8 (2x2x2) iterations being created.
Sequential
A sequential loop runs each iteration of the loop in sequence, with the results of the first iteration made available to the second iteration. The results of the second iteration made available to the third iteration and so on.
A sequential loop will provide the first value of all the parameters/dataslots you are varying to the first iteration, the second value to the second iteration etc. This means the number of iterations that will be run in a sequential loop is determined by the number of values you provide to the parameters you want to vary and also results in an extra validation requirement - all the parameters/dataslots you are varying in the loop must have the same number of values/ datasets provided.
Given the previous example with two parameters and a single dataslot, you would need to make sure to provide the same number of values for both parameters as well as the dataslot. In fact, the previous example would also work for a sequential loop but would only generate 2 sequential steps:
1.
first_name: 'Joe'
surname: 'King'
input_dataset: 'family-tree-one-dataset-id'
2.
first_name: 'Holly'
surname: 'Wood'
input_dataset: 'family-tree-two-dataset-id'
Any outputs from the first sequence would feed into the second one.
Note: Currently, DAFNI limits the number of iterations in a loop to 50. If you would like to have more than 50 iterations - while looping over parameters - you should consider using the parameter sweep step, which loops over models directly and allows for up to 4,000 iterations. The functionality provided by the parameter sweep may be suitable for your purposes.
You should keep the differences in the types of loop in mind when choosing which to use for your particular usecase. If you are running a Model on different areas of the UK then a parallel loop may be better for you. If you are running a Model for different periods of time where the results of each period of time are affected by the previous period of time's results then a sequential loop might be more appropriate.
Loop Step Options in the Workflow
For the purposes of this tutorial, let's choose a parallel loop step because the "R number" parameter we are varying will produce completely independent loop iterations.
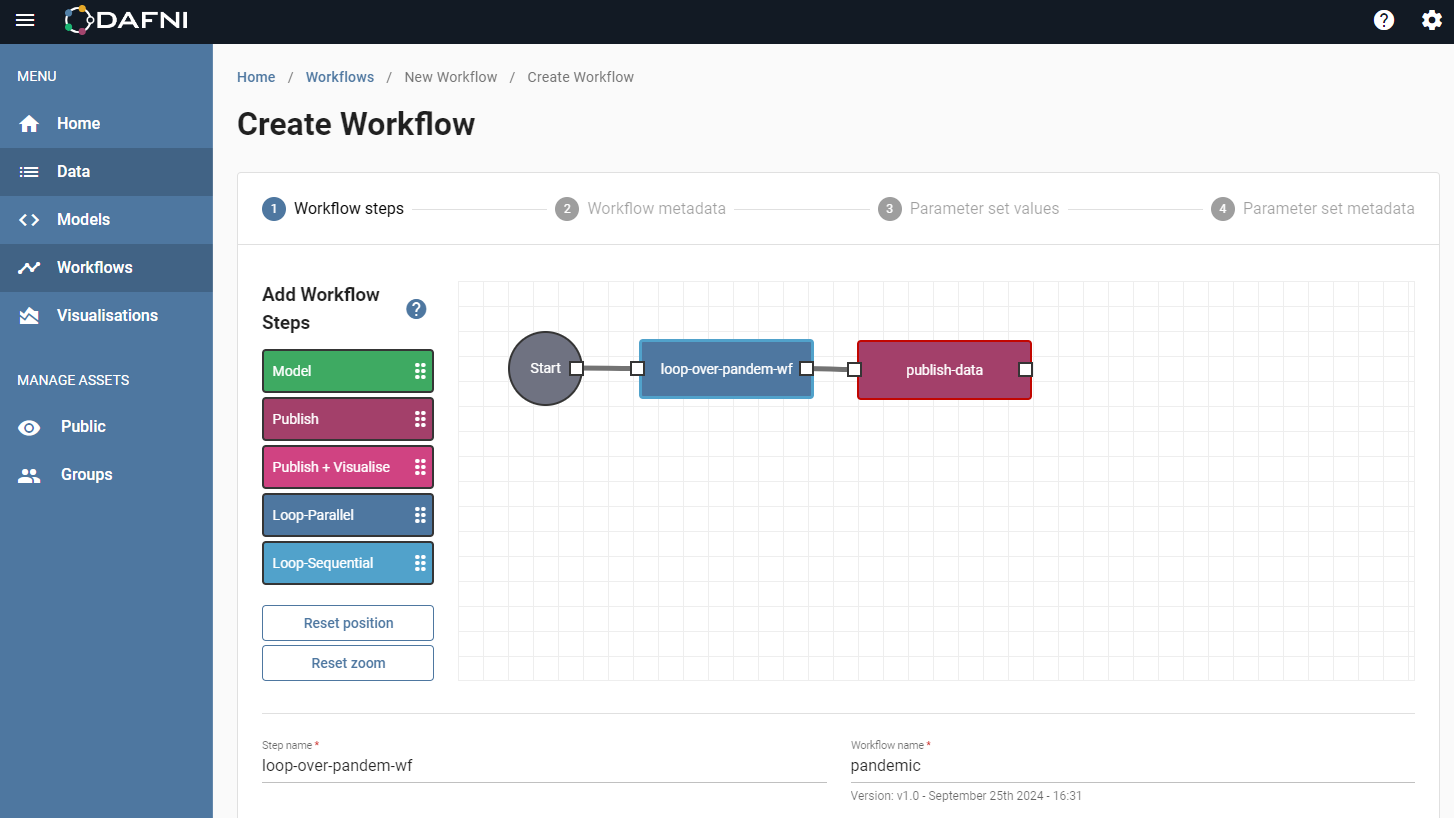
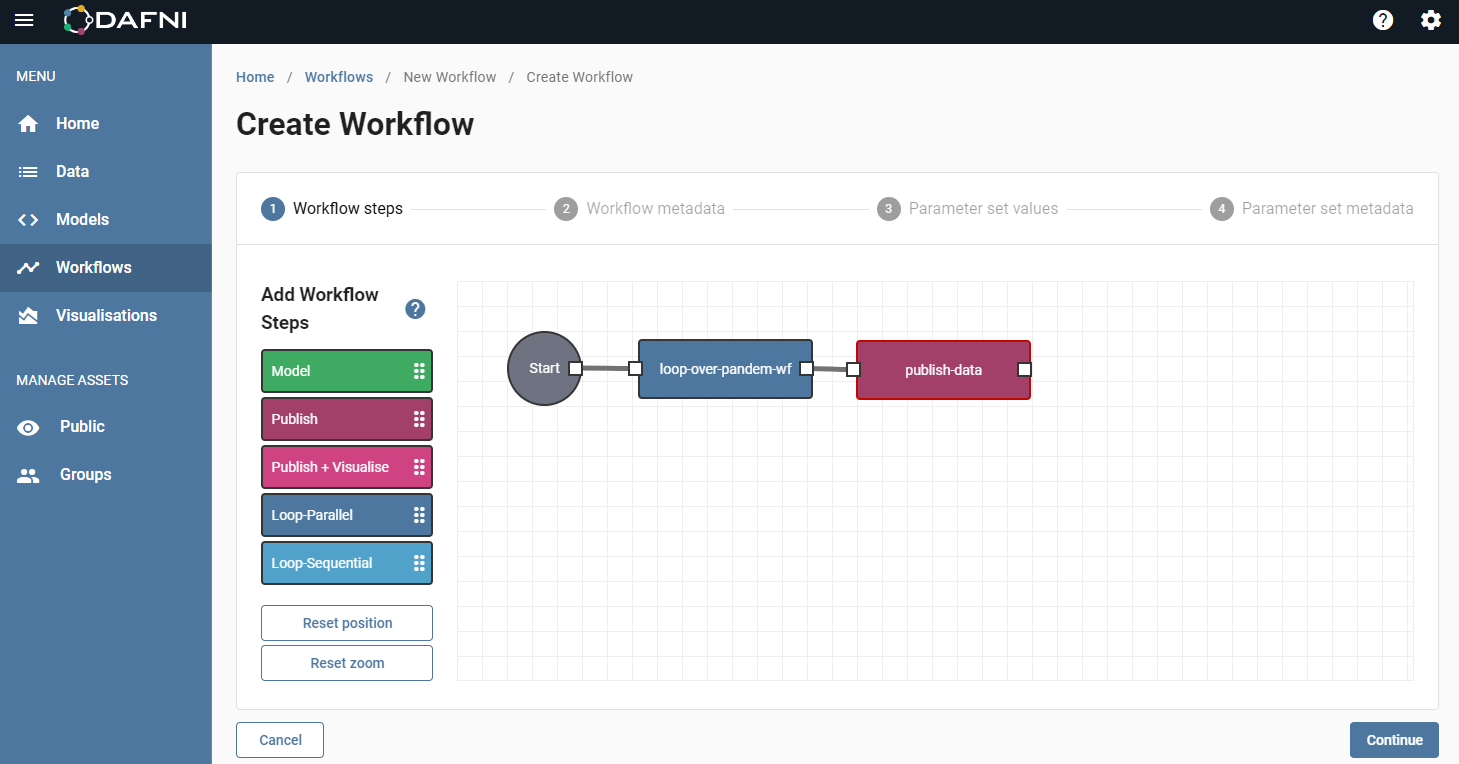
As you can see in the previous image there are actually very few options to add when initially adding in a loop step to a Workflow. This is because you will enter the parameters/dataslots you wish to vary when creating the Parameter Set for this Workflow. As with every step type, this step will need a name - let's call the step "loop-over-pandemic-wf". The only other information we need at this point is to pick the Workflow that this step is going to be looping over. As we will be looping over the Workflow created earlier in this tutorial, click under "Workflow Name" to open a dialog box with the inside it as below.
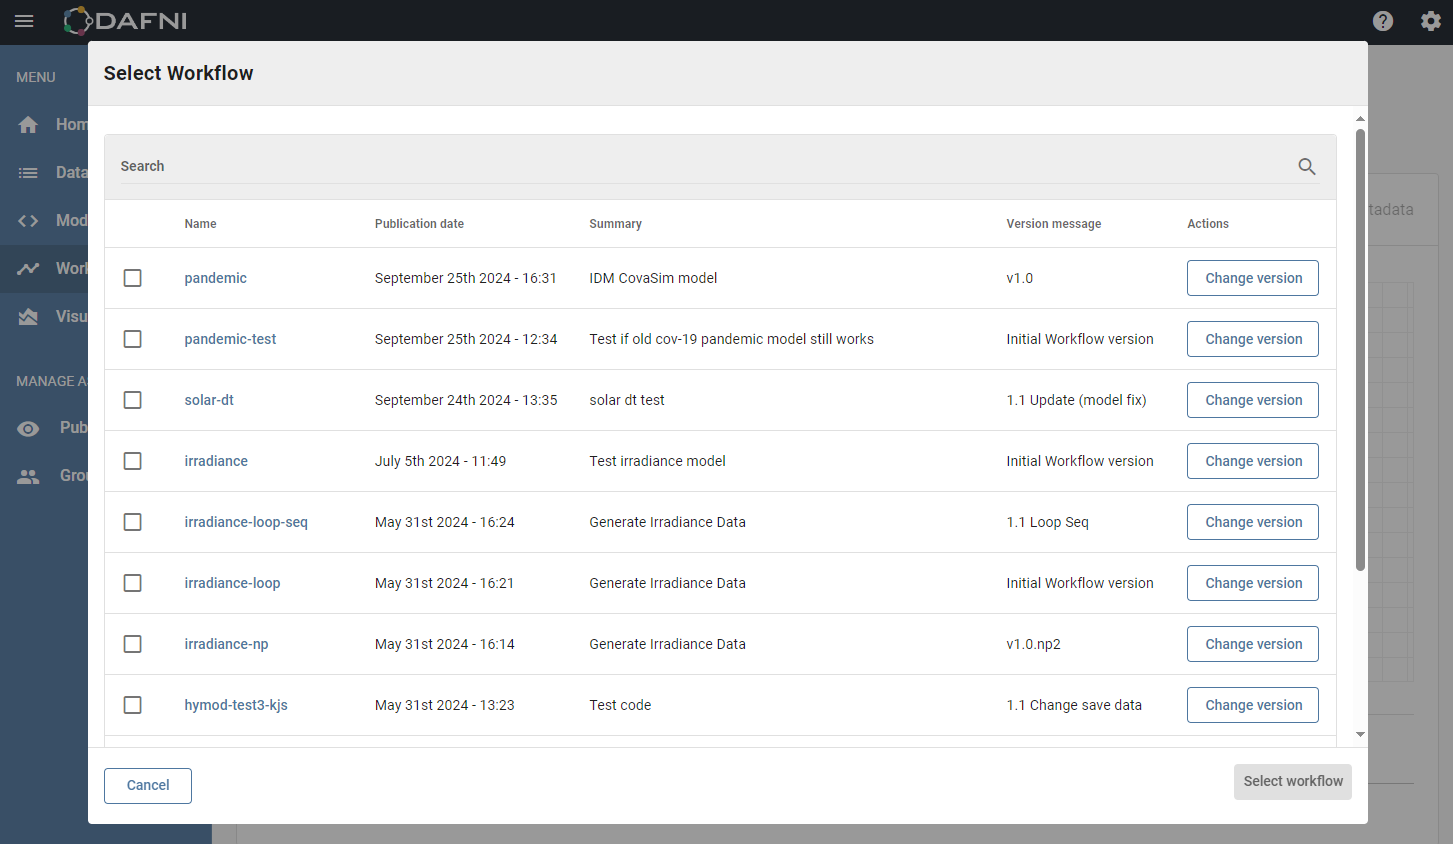
Search for the Workflow you would like to loop over and then press the checkbox to the left of the name when you have found it. Once you have the Workflow you would like to loop selected then press "Select workflow". The dialog should now close and the name and version information should be displayed in the "Workflow name" field. Continue as usual for a step to finish creating the loop step and you will see it added to your Workflow as below.
Uploading Loop Step Results
To publish a dataset containing the results of a loop step, we can add a publish step to the Workflow
we are currently creating and select the loop step as the "Step to include files from". This publish step will
create a single dataset with all of the results of all of the iterations of a loop included in the dataset.
If you upload a dataset this way then the files in the dataset will be prefixed by the loop step name, the name
of the step that produced the file and then the iteration number i.e.
{loop step name}-{step name}-{iteration number}-{file name}. This is to allow you to work out
which iteration and as a result which parameter values produced which file in the dataset.
Once you have finished adding steps to your Workflow you can press "Continue" to then add metadata for the Workflow.
Parameter Set Values - Loop Step Options
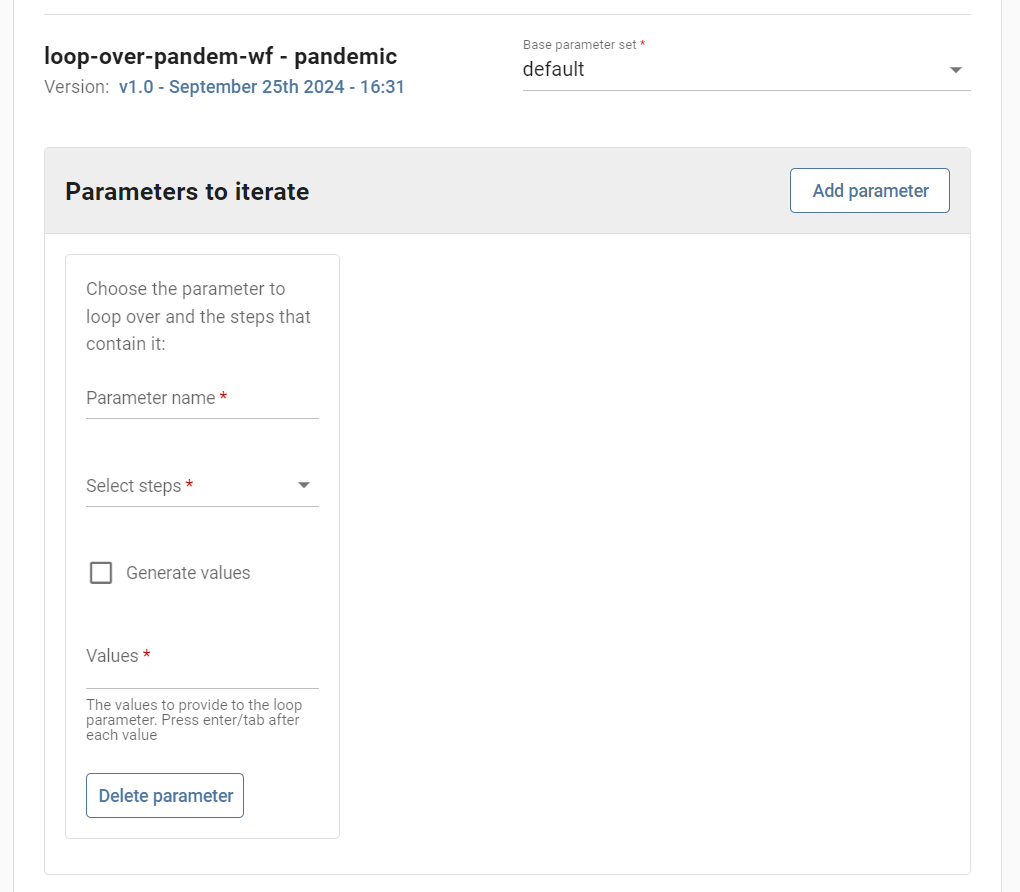
Once you have finished adding the metadata for the Workflow itself, press "Continue" and then left click on the loop step (blue box) to add the parameters and dataslots that we are going to vary.
First you should pick a a "Base Parameter Set" for the underlying workflow (that is being looped over), then set the loop itself.
Base Parameter Set
As mentioned previously in this tutorial, a loop step needs a base parameter set for the Workflow it is looping over to determine what values will be provided to the Model steps in addition to those values it is varying. This is set through the "Base parameter set" field, this is a drop-down that will show the list of Parameter Sets for the Workflow we chose to loop when adding the step. Choose a Parameter Set to use, if you are following this tutorial then there will likely only be one to choose from.
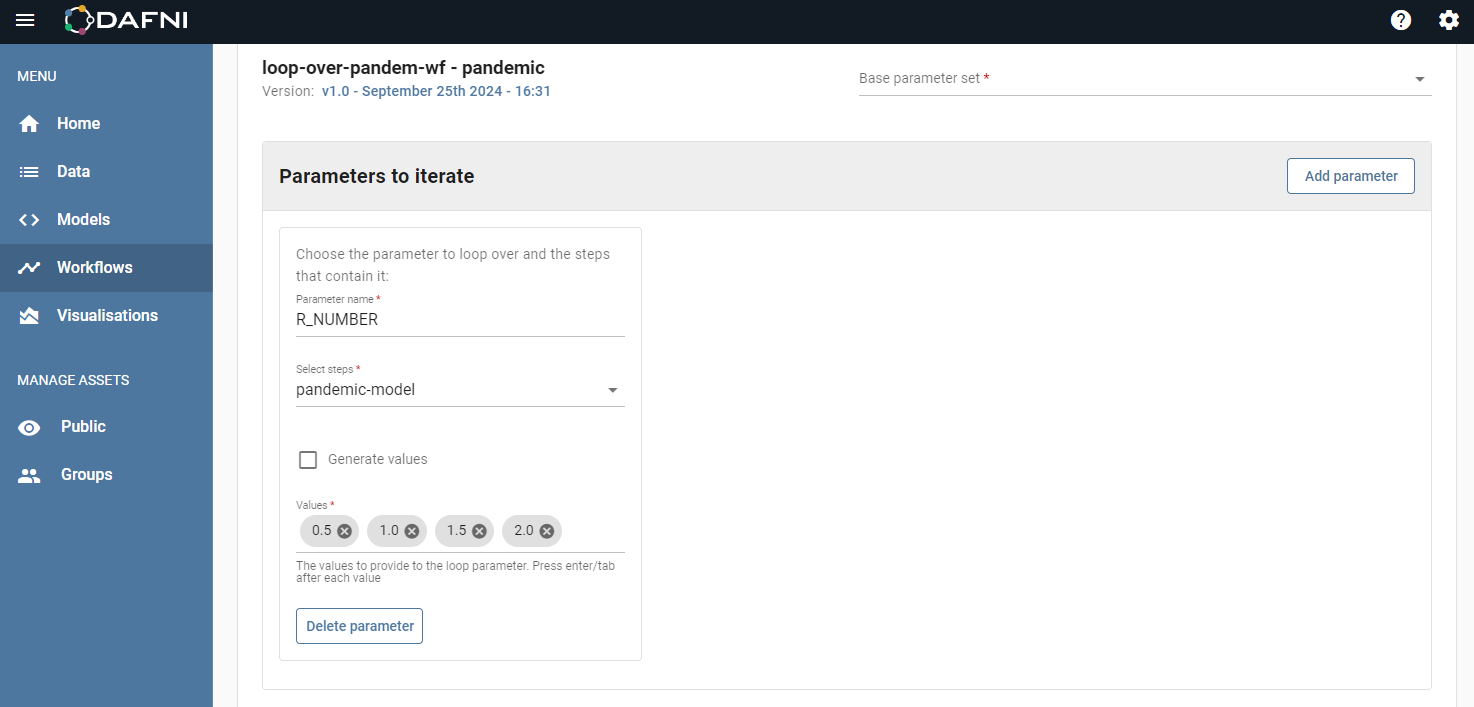
Parameters to Iterate
The section, "Parameters to iterate" is where things start getting a little more complicated (the image above shows what a mostly complete version looks like). This section will typically start empty though, to add a parameter to the loop step press "Add parameter". You will see the section expand to show some more options, as below:
The first thing to do is select the steps that you want to vary a parameter for, you can vary one parameter in many steps at the same time. You can vary more than one parameter but you will need to add a new parameter for each parameter you want to vary. The "Steps" field is another drop-down, this will show the list of Model steps that exist in the Workflow that is being looped. The Workflow we are looping contains only one Model step so there will be only one in the list - "pandemic-model". Select this and we can move to the next field.
Next, we need to add the name of the parameter that will be varied. At the moment, you need to remember the name of the parameters you would like to vary - in a future update, we will be providing lists of available parameters to make creating a loop step easier. Enter the name of the "R Number" parameter into the "Parameter name" field, this needs to be the name of the parameter and not the title of the parameter. The name for "R Number" is "R_NUMBER", you can find out the name of a parameter by looking at the Model details page.
Now we need to decide on how we will be providing the values for the "R Number" parameter. In DAFNI you can either specify values manually or, if the parameter is a numeric one, you can generate values for the parameter using a random number-sampling technique on DAFNI. If your parameter is not numeric or you decide to specify values manually then leave the "Generate values" checkbox unchecked and enter the values into the "Values" field below it. After you type a value press "Enter" on your keyboard to confirm the value and you should see it become a "chip" like below:
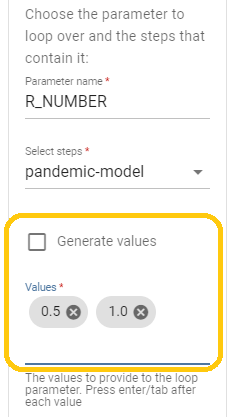
These are the values we'll be using for this loop but I will quickly cover generating values in the next section to be thorough.
Generating Values
If you would like to generate values for your parameter then check the "Generate values" checkbox and you should see the "Values" field disappear and the "Count" and "Distribution" fields appear as below:
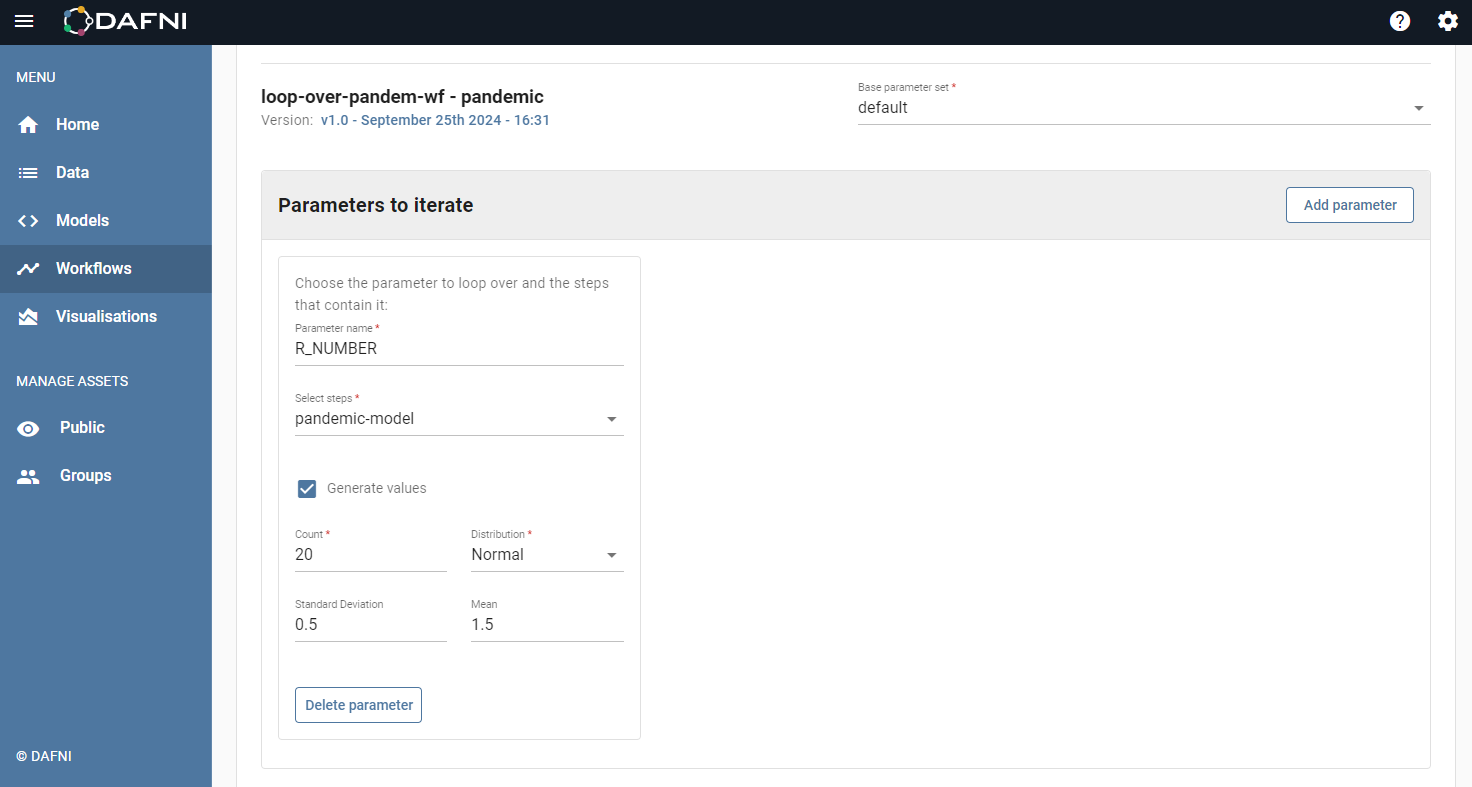
The "Count" field will tell DAFNI how many values to generate.
The "Distribution" field is a drop-down that lists the possible ways you can spread (or distribute) the generated values. Currently, DAFNI allows you to generate values in two possible distributions "Normal" and "Uniform". To learn more about them it's probably best to read the documentation for the package we use here. As you can see the package has plenty more distributions that it can generate, if you would like us to add an additional distribution to the list then make an issue on our user feedback board. Depending on the distribution you choose, two more fields will appear below "Count" and "Distribution". This is because each distribution requires different options to know how to generate the values.
For "Normal" distributions either a standard deviation or a mean value is needed to generate the values - or you can provide both if you would like to. These values can be entered into the "Standard Deviation" and "Mean" fields.
For "Uniform" distributions both a minimum and a maximum value are needed to generate the values, the only requirement is that the minimum must be lower than the maximum value. These values can be entered into the "Minimum" and "Maximum" fields.
Dataslots to Iterate
The final section for a loop step is the "Dataslots to iterate" section. Similarly to the previous section, this section starts empty, a dataslot can be added to the loop step using the "Add dataslot" button. Pressing this button will also see the section expand and a new dataslot will appear as below:
Each dataslot in a Model can be provided with many datasets; in order to enable looping without losing this functionality, each iteration of a loop that is looping over a dataslot must be able to take many datasets.
The first thing we need to do is to select the steps that you would like to vary this dataslot for, as with parameters you can do this by clicking on the "Steps" field and choosing the steps from the drop-down menu that appears.
Next, we need to tell the loop step what the dataslot we are varying is called, enter the name of the dataslot into the "Dataslot name" field. You can find out the name of a dataslot from the Model details page.
You have probably noticed that you haven't yet added any datasets that you want to use as iterations for this dataslot. In order to start adding iterations to your dataslot press the "Add iteration" button. A table will appear, this table shows the datasets that will be provided to the dataslot during this iteration. It will initially look like below:
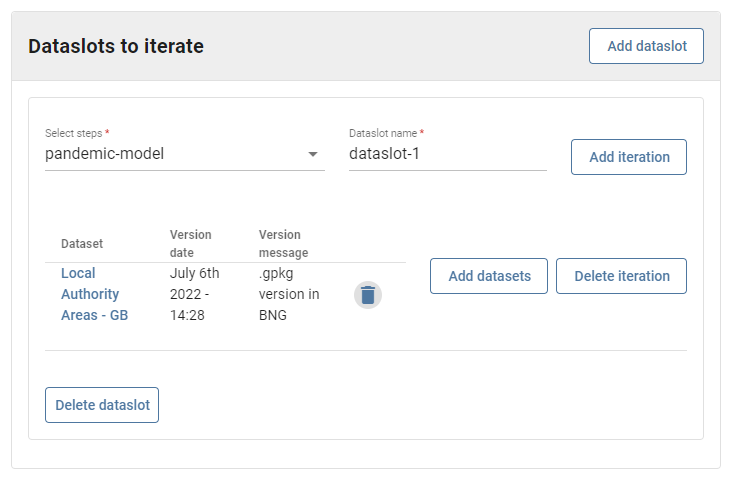
In order to add datasets to this iteration press the "Add datasets" button, a dialog will open showing the data catalogue, similar to when you select datasets for a dataslot in a Model step. You can select dataslots by clicking the "Select Dataset" checkboxes next to the datasets in the dialog, you can select as many datasets as you want before pressing the "Confirm" button to close the dialog. The datasets that you select here will comprise one of the lists of datasets in the overall list of lists.
This will result in a loop step with one iteration that takes the datasets listed in the table. In order to add another iteration, repeat the process of pressing "Add iteration" then the "Add datasets" button and selecting some datasets. Each table represents an iteration of the loop.
Finishing up
Once you have finished customising the loop step to vary the parameters and dataslots you would like then you can press the "Set parameters and datasets" button to apply these changes to the step. You can then press "Upload workflow and parameter set" to finish the Workflow and upload it to DAFNI.
Now you have a Workflow that will perform a loop of the Covid 19 Model and can run this as you would run any other Workflow in DAFNI.